Stream Car Transactional Data to DynamoDB
Populate Data In DynamoDB with the Cloud9 IDE
Navigate to Cloud9 by clicking the link, or you can also search Cloud9 on the AWS search bar and click on the icon:

Once you’re in the Cloud9 IDE, you’ll need to set up the Python virtual environment. Run the following 2 commands separately:
python3 -m virtualenv myenvpy3source myenvpy3/bin/activateWe’ll need to install the boto3 library. Run the following command:
pip install boto3In Cloud9, use the copy command to copy the script from S3 into the Cloud9 file system. Run the following command:
aws s3 cp s3://rocksetawsworkshop/scriptReadS3.py .Open up scriptReadS3.py by double-clicking on the file. Paste your Access and Secret key you got from CloudShell:
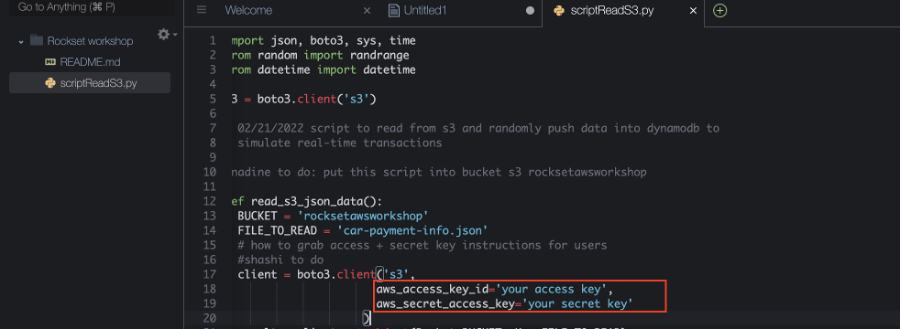
In the Cloud9 terminal, export your keys like this – please don’t add quotation marks around any of the values below. Make sure to replace the values with the AWS credentials we got earlier:
export AWS_ACCESS_KEY_ID=yourkeyexport AWS_SECRET_ACCESS_KEY=yoursecretexport AWS_DEFAULT_REGION=us-east-1Now you can run the script by executing:
python scriptReadS3.pyNavigate back to DynamoDB services. Click on Tables → Update settings via the left nav. Click on the table rockset_carpurchases. If you click on explore table items, you’ll see the records that were added from the script:

After you’ve got 10 or so records in rockset_carpurchases, kill the script:
   Linux/MAC/Windows:
    - Press "control"  and  "c" together
    - Press "ctrl" and "c" together
NOTE: We’ll re-run the script during the Grafana portion of the workshop.
RECAP
We are able to simulate a real-time stream by running a script in Cloud9 that sends transactional data to DynamoDB.